


Overview
The Leg View is the primary view for updating entries in APDL. The Leg View can be accessed from multiple areas throughout APDL by:
- Tapping a trip on the Calendar View, then selecting a leg
- Tapping a trip on the Schedule View, then selecting a leg
- Tapping a row on the Logbook View (iPad only)
- Tapping the Active Flight widget on the Status Board
- Tapping the leg highlighted on the Map View
If you open the Leg View for a preloaded flight, your preloaded data will be displayed. Since this is just scheduled data, some fields will be missing. Tap each field to update.

Tapping the Save button at the top right of the window will save changes made on the Leg View and return to the previous view.
Tapping the Cancel button at the top left of the window will prompt you if changes have been made. If you select yes, changes made will be canceled and you will return to the previous view. If enabled in settings, you can skip this prompt. If no changes have been made, you will simply return to the previous view.

After the required data has been entered and saved, the leg will be closed out. Opening the Leg View for a closed out leg will display all the data in a read-only format. A locked out leg is indicated by a lock icon at the top right of the window where the Save button would be. Any attempts to edit data on a locked out leg will prompt you to unlock the leg by tapping the lock icon. After unlocking the leg, edits can be made again.

Payroll
The payroll row is used to determine Payroll and Legality. Certain selections will change the layout of the Leg View to correspond to the appropriate data for that type of payroll.
If you have a 3D Touch enabled device, you can force touch the payroll row to peek at the details of that payroll category. A harder press will allow you to pop into the Payroll Settings view to edit the details of that payroll category.


Flight Number
Flight number is a free form field for you to enter your flight number.

Departure/Destination
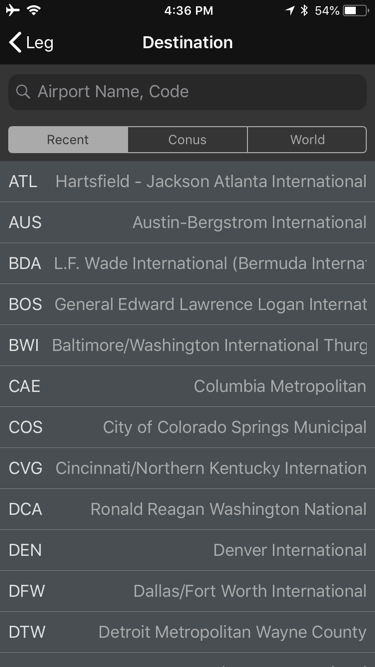
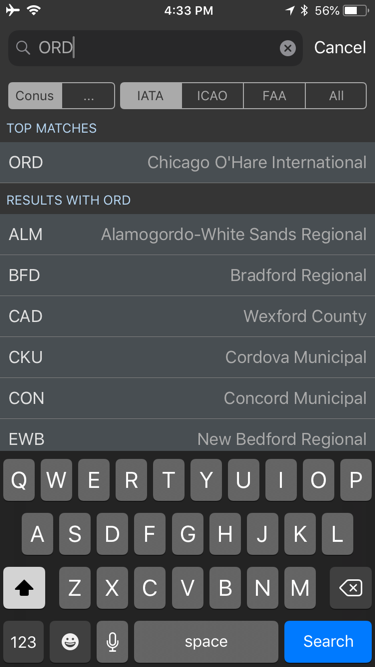
Choose your departure and destination airports from the APDL database. Airports can be grouped by tapping the tabs at the top of the window. Options are world airports, US airports (Conus), and Recently used airports. The search bar at the top allows you to search for an airport. You may need to select the Conus or World tab if your airport doesn't show up in the recent list which is shown by default.
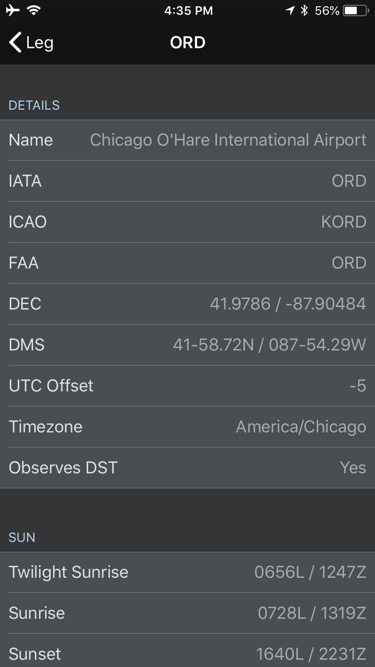
On the Trip View itself, if you have a 3D Touch enabled device, you can force press to peek at the details of your selected departure and destination airports, while a harder press or swipe left will allow you to pop to that page to edit that information. If you tap on the departure or destination airport to make a selection from the list of airports, you can force press to peek at the details of each airport in the list as well.

![]()
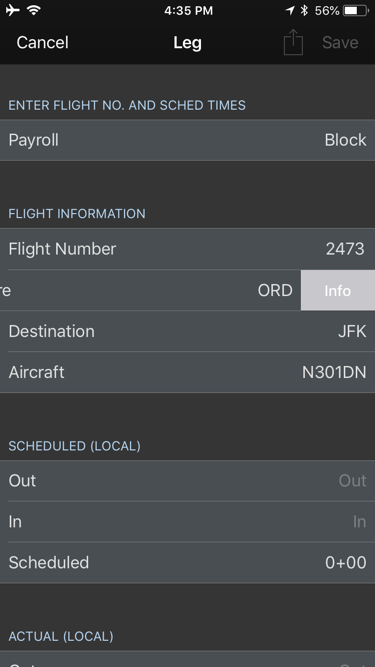
Aircraft
Choose your aircraft from the APDL database. Select from the list or search in the bar at the top of the window. Aircraft are attached to an aircraft type to simplify the entry process and avoid errors. New aircraft types must be added from the settings area, while new aircraft can be added from the settings area or from the Leg View.
If you have a 3D Touch enabled device, you can force press to peek at the details of each aircraft in the list. Once an aircraft has been selected, you can force press to peek at the details directly from the Trip View as well. A harder press will allow you to pop directly to the Aircraft Settings view to edit those details.


AutoFill Now
AutoFill can be manually triggered without waiting for the time delay by tapping the "AutoFill Now" button.

In order to use AutoFill Now, certain conditions must be met. At a minimum, you must have chosen an Airline in Settings > Airline and entered flight number, departure airport, and UTC date of departure. If the same flight number is used multiple times in a day, enter the destination airport to improve AutoFill Now results. Using AutoFill Now may result in incomplete data as it does take some time for the cloud resources to be updated with actual OOOI times.
AutoFill requires an airline code to retrieve data from our cloud resources. As a result, deadhead flights will not be able to autofill unless they are on your own airline. If you are deadheading on a different airline, you can enter the airline code prefix to the flight number in order to enable autofill for off-line deadhead flights. For example, if deadheading on a Delta flight and you don't work for Delta, enter "DAL1234" as the flight number instead of just "1234".
There is more to the AutoFill Now feature than just closing out a flight when done. It can also be used as a schedule importer. If you picked up a flight or did not or could not use the schedule importer, enter the flight number and then enter your departure and destination fields. AutoFill Now will pull in your scheduled times and gates for your new flight, and of course if the flight is already flown, your actual times, aircraft if available, etc.
So as you can see this is not just a flight close out feature but also for flights picked up or changed that can even load scheduled info such as a pseudo schedule importer. More details on AutoFill can be found in Settings > General.
AutoFill can only process flights within the past 7 days or upcoming 3 days.
Times
All time editors within APDL function the same. On the Leg View there is a section for Scheduled and Actual times. Scheduled times should be preloaded automatically with the importer or manually. Actual times are entered when the flight is completed. Tap each row to enter the associated time. Tapping a row will expand the view and display the time editor. The time zones used for the top and bottom rows of time editors will vary depending on your time zone selections in Settings > Leg View. If you use the default settings, the top row will display local time and date for the departure or destination airport selected above as appropriate. The bottom row will display UTC time and date. The green box indicates the digit that is currently being edited. You can tap any digit on the local or UTC row at any time to edit it. Changing the "Enter Times In" setting in the Settings > Leg View will set the green box to default to the local or UTC row as selected.


To clear an erroneous entry, tap the black "x" icon to the right of the active row.
![]()
Tap the next row to sequence the time editor to the next time for editing.

After entering the In time, you can tap the "Block/Flight" row to close the time editor. Alternatively, you can tap the active row title to close the time editor.

The Scheduled and Block/Flight rows calculate and display the totals according to the times entered. Block is calculated from Out to In while Flight is calculated from Off to On.

Taxi Time
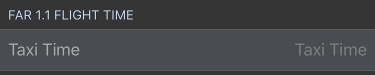
The Taxi Time field allows you to use the FAR 1.1 definition of flight time to calculate your legalities in APDL if you choose. To use Taxi Time, enter the time your aircraft first taxied under its own power in the Taxi Time field. This is differentiated from "Block Out" which is typically pushback time. Entering a Taxi Time will use the FAR 1.1 definition of flight time for legality calculations on that leg. Otherwise, block time is used by default.
The Taxi Time field can be hidden from view by turning off "Enable Taxi Time" in Settings > General > Misc.
Regulation
The regulation field allows you to select which type of regulation your flight falls under. This affects how APDL calculates your legality limits. Automatic selects the appropriate regulation based on your entire duty day. You can manually override the automatic selection if needed.


Position
The position field allows you to specify your role during the flight. This selection determines if various things will be logged in your logbook such as landings and PIC. Specific settings can be configured in the settings area.
If you have a 3D Touch enabled device, you can force touch the position row to peek at the details of that position. A harder press will allow you to pop into the Position Settings view to edit the details of that position.


Night
APDL automatically calculates night for you after times are entered based on your data and civil twilight times. Entering Off and On times enhances the accuracy of the auto night calculation. You can manually enter a night value here if you wish to do so. The blue text below the night time editor displays the calculated night time. Tapping this value will set night to the auto calculated time after making a manual entry. To clear the night entry tap the black "x" icon on the right side.

When specified by your settings for the currently selected Leg View (CA-PF or CA-PM), APDL automatically logs your landings as a day or night landing based on the time of the landing with reference to sunrise or sunset as appropriate at the destination airport. Prior to completing the flight, APDL will display either "Scheduled Day" or "Scheduled Night" to indicate what type of landing is anticipated for that flight.
![]()
![]()
![]()
Note
Due to the way night flight time versus night landings are determined according to FARs, it is possible for a flight to have some night time logged while a day landing is logged. For more details on how this can happen, see Why does my Flight have Night Time but no Night Landing?
Instrument
Manually enter your instrument time here if applicable. The blue text below the instrument time editor allows you to quickly enter the entire flight duration from Off to On as instrument time if desired.

Approach Type
Allows you to select the type of approach flown, if applicable.


Crew
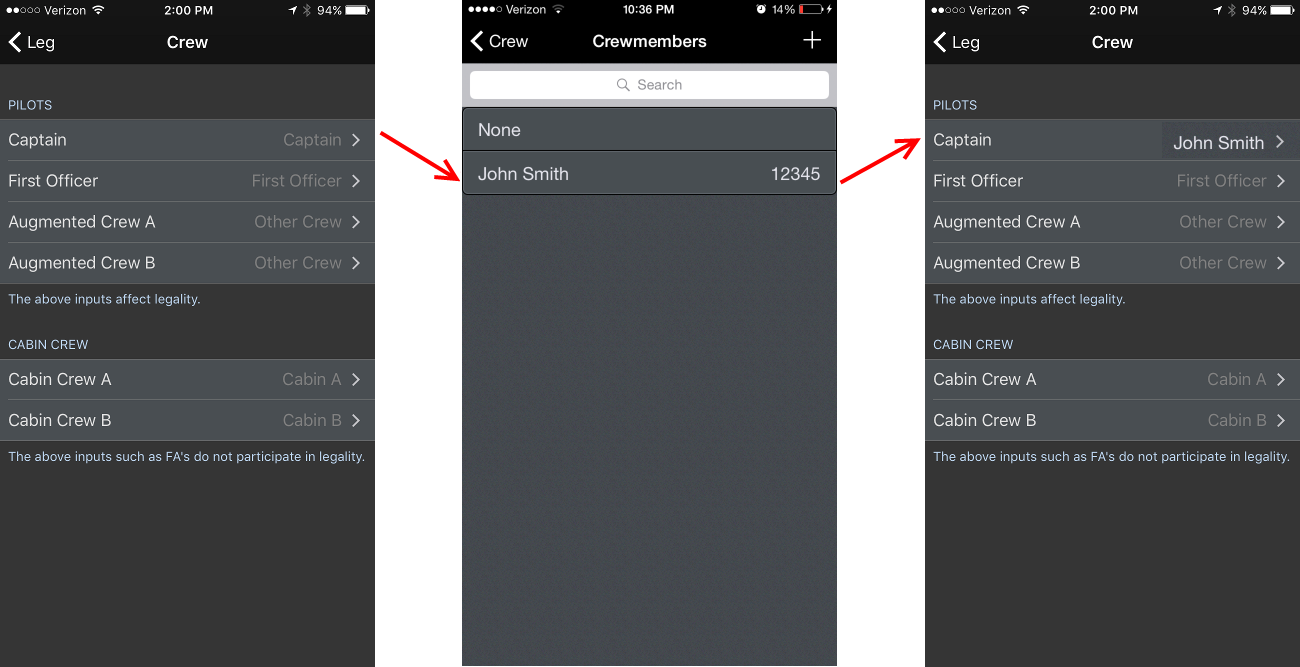
APDL keeps a database of crewmembers you have entered. You can choose or search for a crewmember from the list for multiple positions of your flight crew. You can add new flight crewmembers from the settings area or from the Leg View by tapping the plus icon at the top right of the window. If more than two crewmembers are entered in the Pilots section, APDL will treat that flight as an Augmented operation with more than 2 pilots and use the appropriate regulations accordingly. Be sure if you enter flight attendants that they go into the Cabin Crew section so Augmented operations are not inadvertently triggered.
If you have a 3D Touch enabled device, you can force press to peek at the crewmembers selected for that flight, while a harder press will allow you to pop to that page to edit that information. The same is true on the subsequent page where you can force press to peek at the details for each specific crewmember. In this case however, you will have to go to settings > crewmembers to edit crewmember details.
Go to the Leg View area of settings to view more details and statistics on your crewmembers.

Rest Facility
The Rest Facility row displays the rest facility class selected for the leg you're viewing. This selection will be used in legality calculations for augmented operations.
![]()
APDL will fill in this row with the rest facility class according to the following:
- Default rest facility class for the aircraft type. You should set the default rest facility class for any aircraft types you fly which have rest facilities and are used in augmented operations. You can do this under Settings > Aircraft Types.
- Default rest facility class for this specific aircraft. If your airline has some specific aircraft configured differently than the majority of the fleet, the rest facility class may also be different. You can override the default rest facility class set for the aircraft type by setting a default rest facility for individual aircraft under Settings > Aircraft Types > Aircraft.
- Temporary rest facility class for this leg. If the rest facility on your aircraft has damaged equipment which downgrades its rest class, you may need to override the rest class for one leg only without affecting the defaults set above. You can override the rest facility class on a leg by leg basis by tapping this Rest Facility row to expand it and selecting which rest facility class is appropriate. The next time you use this aircraft, it will revert to one of the two defaults set above as appropriate.
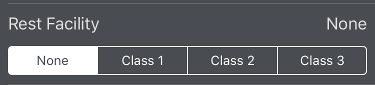
If you do not have any defaults set for an aircraft and you manually select a rest facility class from this row, APDL will display a prompt asking if you want to set the rest facility as default for that aircraft. You can use this method to gradually get all the rest facilities set for aircraft rather than setting each one manually in settings.

Since it's possible to fly an aircraft with a rest facility on a flight that is unaugmented, APDL does NOT switch to augmented operations legality calculations because a rest facility class has been designated. Entering a crewmember in an augmented crew position is what triggers augmented legality calculations.
Notes
This is a free form window for you to enter notes or remarks about the flight. Various information about the Departure and Destination airports is also displayed on the notes page. If you have a 3D Touch enabled device, you can force press to peek at the details of any notes already entered, while a harder press will allow you to pop to that page to edit that information.
The notes page also allows you to enter notes about the departure and destination airports. These notes are saved for that airport and will be visible on all other flights where that airport is selected.


Resources
Tap the resources row to view a multitude of information about your flight such as the FAA EDCT time and much more from sources such as FlightAware and FlightStats.
This can be quite helpful if you need to retrieve OOOI times from a previous flight that you didn't get logged and the AutoFill timeframe has passed.

You can choose the departure or destination airport with the selector at the top of the screen.


Delete Leg
Tap this button to delete the current leg.

Social Networking
You can tap the share button on the toolbar next to the save button to share your flight on Facebook or Twitter.

APDL provides a suggested caption to post with your flight on the clipboard for you to paste in the social network dialog. If you prefer, you can enter your own completely custom caption.


The share button is disabled until you have entered the required information to close out the flight.