


https://www.youtube.com/watch?v=LnUni16slmU&index=5&list=PLt5jhPpkokeL7jZrgoINs1synCP7F3iAy
Overview
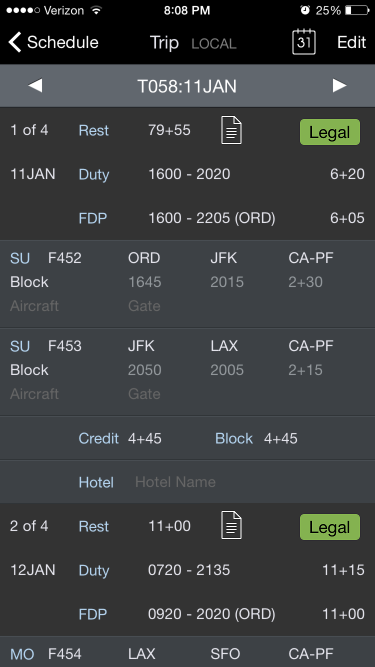
Trip View is the primary view for displaying and navigating your schedule during a trip. The Trip View contains a lot of information in one place. Some elements of the Trip View will vary automatically depending on the trip being displayed. All times displayed are in the time zone listed at the top of the screen for the associated airport unless otherwise noted. This time zone can be changed in Settings/General. A map of your trip is displayed at the bottom of the Trip View.
Navigation
To navigate the Trip View, scroll up and down to view all days of the trip and the map at the bottom. The navigation bar at the top of the screen displays the trip number and date.

You can tap the arrows on either side of the navigation bar to sequence forward and backward through days of the trip. If you are at the last day of the trip and tap the right arrow, it will sequence to the first day of the next trip. The same logic applies on the first day of the trip when tapping the left arrow, it will sequence to the last day of the previous trip.
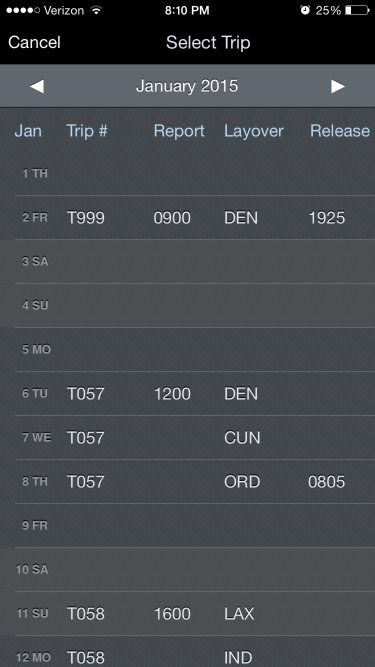
Alternatively, you can tap the calendar icon at the top right of the screen to jump directly to a specific date.
Header
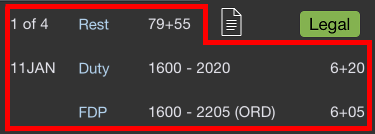
Your trip is broken into sections by duty period. Each duty period of your trip starts with a header section. The header section consists of rows of summary data.
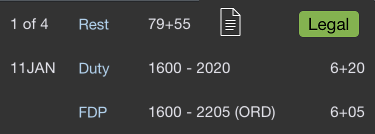
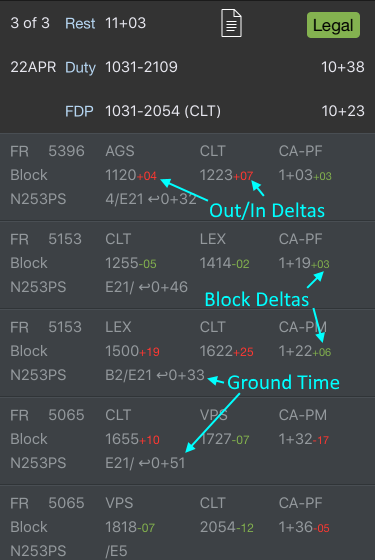
The first row of the header section starts with the day of the trip and the amount of rest prior to beginning the duty period.
The next row displays the date, duty start and end times, and duration of duty on the right side. Times are displayed according to the airport where you begin and end your duty accordingly.
The last row displays Flight Duty Period (FDP) start and end times, and FDP duration on the right side.
If the duty period contains a Reserve Availability Period (RAP), the RAP start and end times as well as duration will also be displayed here.
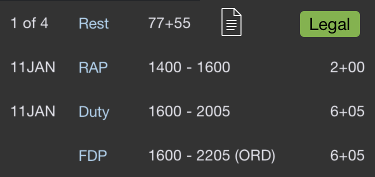
At the upper right of the header section is the Legality Lozenge. This indicates your legality status for that specific duty period. Tap the Lozenge to go to the Legality Status Page for more details on your legality for that duty period.
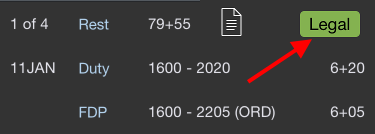
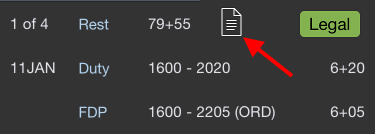
The Report icon to the left of the legality lozenge allows direct access to the Legality Report from the Trip View. Two options are available when tapping this icon; the full legality report and a shortened trip sheet that only displays page 1 of the legality report.
Tap any row of the header to edit duty period details such as duty on and off times, RAP begin and end times, or trip number.
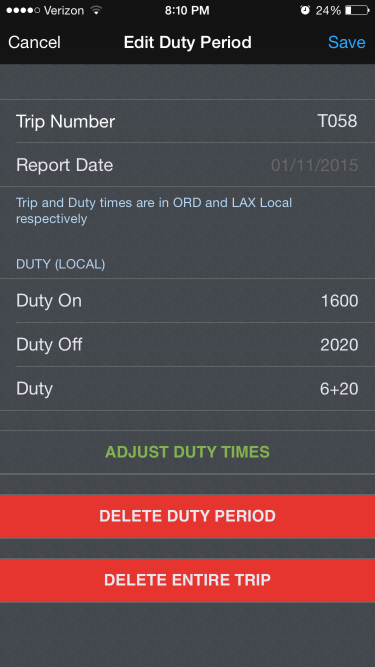
If you have made manual adjustments to your duty on and off times and would like to adjust them back to the default values set in settings/Airline, tap the "Adjust Duty Times" button.
You can delete the selected duty period or the entire trip by tapping the associated button on the Edit Duty Period screen.
Flights
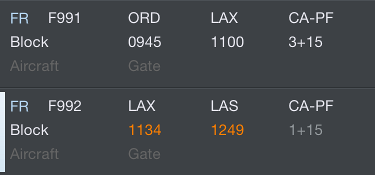
Each flight is listed below the header.
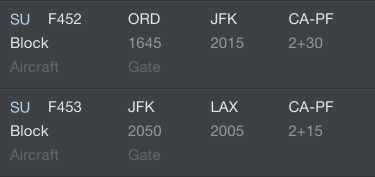
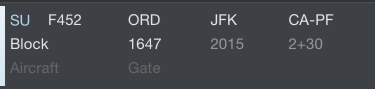
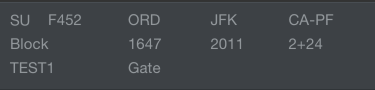
The flight row displays the day of the week, flight number, aircraft tail number, departure and destination airports, position, payroll category, and gate information. Scheduled times are displayed until actual times are entered. Where actual times are entered, actual times are displayed.
An open flight entry with dark gray text indicates missing data.
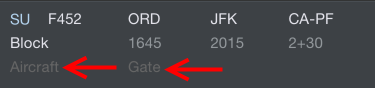
Light gray text indicates scheduled values.
As portions of the flight are entered, those parts will turn white. This allows you to easily identify at a glance which values are scheduled, which values have been entered, and which values are missing.
Once all required data has been entered and the flight is closed out, the entire flight will be colored gray or the flight number will be crossed out depending on your selection in Settings/General.
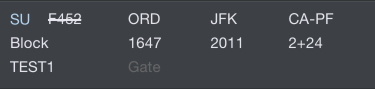
An aircraft icon next to the gate information indicates a change in gate from the previous flight. This indication is intended to alert you that there may be an aircraft change. This could also be indicated with a slide up notification.
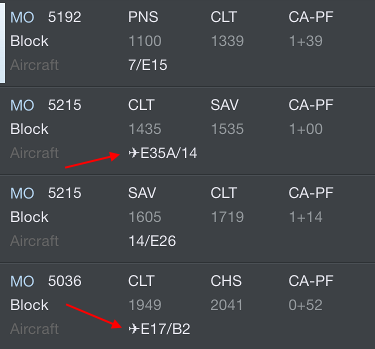

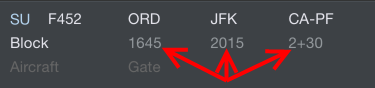
As of version 8.0, APDL is also capable of displaying overblock and underblock values, OOOI early and late values, as well as ground time between individual flights on the Trip View. These can all be toggled on or off in Settings/General.
The Out/In Deltas show differences between scheduled and actual Out and In times. These values are displayed in green if early or red if late.
The Block Deltas show differences between scheduled block times and actual block times. This is displayed as green for overblock and red for underblock.
The Ground time shows the time on the ground between legs. These values are updated from scheduled ground times to actual or projected ground times as appropriate.
Tap any flight to go to the Leg View.
Projected Mode
If APDL goes into Projected Mode as a result of a delay, any projected values will be displayed in orange. Once the actual values are entered, those values will turn white as described above.

Go to the Legality Report page for more details on Projected Mode and how it works.
Unlike the Legality Report, modifications made on the What If page are not displayed on the Trip View.
Footer
Below the list of flights for a duty period is the footer. The footer displays the total credit and block for the duty period. These calculations are based on a combination of scheduled and actual times depending on what is available. Payroll considerations are also reflected in the footer. Any pay rigs or minimum credit configured in Settings/Payroll Settings will be included. Additionally, after actual times have been entered, you will see small numbers alongside the credit and block totals. These color coded numbers indicate overblock or underblock and any associated increase in credit as of the last leg containing actual times.


Tapping the footer will take you to the Edit Duty Period page just as if tapping the header.
At the bottom of the Trip View is a totals row which displays total credit and block for the entire trip as a whole. TAFB and day and night landings are displayed as well.

Hotel
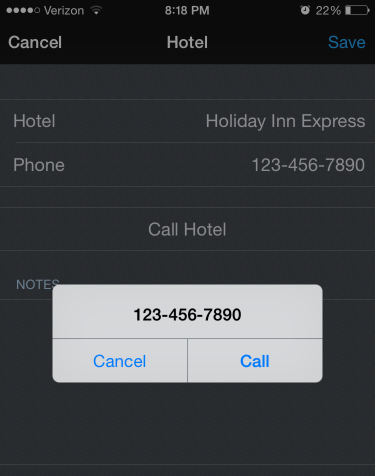
Below the footer is a hotel information row. The hotel row displays the name of the overnight hotel if available. Tapping this row will open a hotel information page with the hotel name, phone number, transportation information, and notes.
You can quickly and easily call the hotel directly from the hotel information page by tapping the "Call Hotel" button. If there are additional phone numbers available in the notes section such as an alternate transportation method, you can tap those to call as well.
The hotel departure time can be entered in the "departure time" row. If you enter a time here, APDL can display this time to you on the Hotel Departure Status Board widget which includes a countdown timer to hotel departure time. APDL will also trigger an iOS notification on your device prior to your hotel departure time as a reminder. You can configure the amount of time prior to the hotel departure in minutes on the "Alert Prior" row. This reminder can be accompanied by an alert sound if enabled with the switch here.
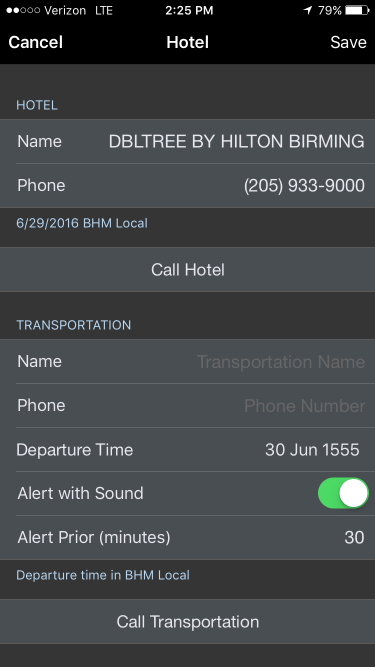
To quickly clear all data about a hotel from this page, tap the Delete Hotel button at the bottom.

Map
The bottom of the Trip View displays a map of the flights that make up your trip for a quick glance. The map can be panned and zoomed on the larger screens of iPad and iPhone 6+. METAR data and airport alert information can be viewed by tapping the colored circles. Full details on these features can be found in the Weather Map section. Radar is not available on the Trip View.
