Data in is only as good as data out and Logbook Pro cuts no corners with providing the top of the line reporting capabilities. Using a fast and configurable reporting engine, Logbook Pro enables the user to easily filter data using the Date Filter window preceding all reports and options to configure page numbering, personalization, row shading, borders, and much more. Reports offer export capabilities like no other with ability to export to web page (HTML), Microsoft Excel, Text delimited data files, Rich Text Format, Multi-Page TIFF Images, and the most popular and universal format, Adobe's Acrobat Reader Portable Document Format (PDF). Reports, once run, can be saved in a Logbook Pro native report format (.RDF) allowing the exact report to be called up at a later time, useful for snapshots of your data. Click the save icon on the report toolbar or the option to save the compiled report. At any time within Logbook Pro, choose the option to open a saved report and select the RDF file and the exact report snapshot will be displayed.

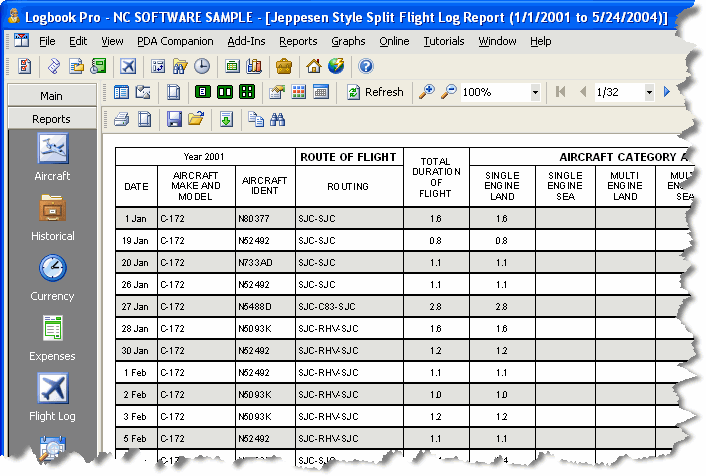
Figure 1. Logbook Pro Report
The report system, as shown in Figure 1 above, is very powerful and configurable, all from the report toolbar and right-click activated popup menu system. Features vary from report to report based on the particular report previewed. Reports, when run, are in a preview mode until you select the option to print. Printing allows the user to print the entire report, page range, or a specific page. Page setup allows complete selection of the target printer, page margin control, and other available print dialog options. The small card with a hand and down arrow is the area to concentrate most of your attention. Within this drop down menu are numerous configuration items from page numbering options, personalization data, row shading, page borders, and much more. Navigating a report is simple using the report table of contents (far left icon on report toolbar) or the page navigation controls on the right side of the report toolbar.
Logbook Pro also offers reports that are grouped by items such as aircraft specifics, month, and year. Preview the different reports to see the numerous report options available. FAA Form 8710 Part III data can be easily printed from the Miscellaneous report menu as well as the Lookback data and a handy Percentages report, showing the percentage of each logged item as a relation to the grand total data.
Several of Logbook Pro's logbook reports such as the Logbook Pro Standard and the Logbook Pro Grouped by reports match the layout of the Spreadsheet Style log area. Allowing complete customization capabilities, format the Spreadsheet Style log, i.e. fonts, colors, sizing columns, hiding columns, etc., and after doing so, the reports mentioned above will also be set to match the set format. Logbook Pro's reports are best formatted by setting the minimum width so as to keep your report within two pages wide. A vertical red dashed line will appear signifying a page break between the first and second pages. This vertical red line is an indicator only and does not print out on the final output.
Logbook Pro offers numerous reports for infinite data analysis but also provides a unique ability to combine reports. If creating a formal presentation of your data for an interview, or just great record keeping, use the Report Combiner to select the reports to combine into one printable package. As with all reports, a date dialog will appear offering the ability to filter your data in a desired range.
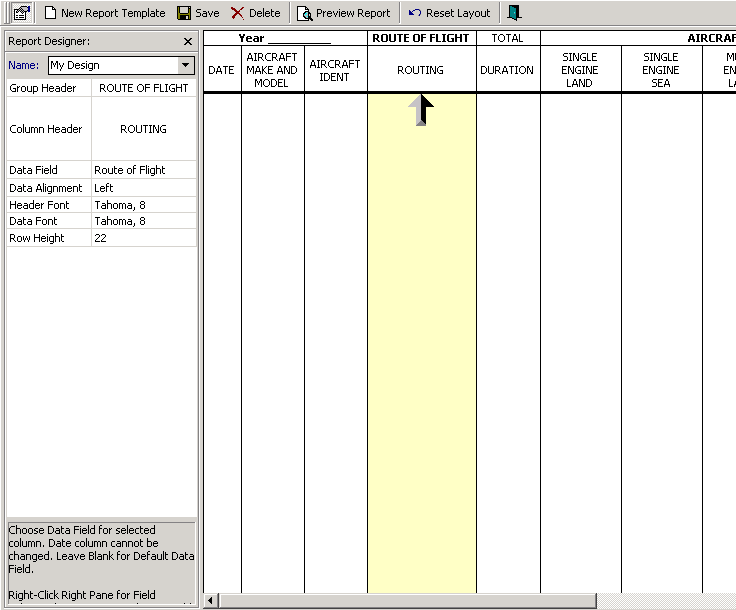
If the plethora of reports that ship with Logbook Pro are not enough, we even offer a report designer capability allowing you to build an infinite number of your own report templates matching that of the popular Jeppesen Style format. Click the option to create custom templates from the Reports...Flight Log...Jeppesen style menu and a report designer as shown in Figure 2 will appear.

Figure 2. Report Designer
The report designer takes a typical Jeppesen style layout and allows you to modify it to fit your needs. Click on a desired column then set the items in the far left side of the designer. Items such as the column header caption, data field, data alignment, font settings and the row height of the final output can be set. Click the option to save the template, any name as you desire, and add new templates to meet your needs. After a template is created it will automatically appear in the Reports..menu just below where the custom template menu item appeared. With the custom template system, you can create your own content and modify formatting within the parameters of the left side preferences. Columns cannot be removed, hidden, resized, or reordered.
Create a .jpg file the same name as your data file and place the image next to your data file (same folder). For example:
Logbook Pro Data File: C:\Logbook\My Logbook.lbk
Create (or rename) your image file and place such as:
C:\Logbook\My Logbook.jpg
Logbook Pro will detect the existence of this image, if it exists, load it in the signature block for you. The new image signature feature will work in any of the SPLIT SERIES reports (standard or Cirrus Elite). Images are suggested to be not greater than 150dpi. Logbook Pro will automatically zoom the image to fit in the available space.

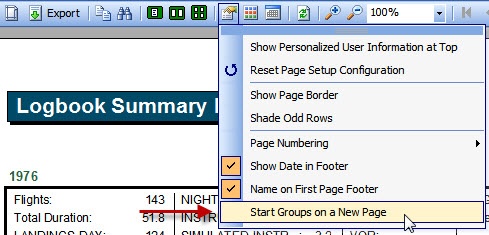
Figure 3. Option to start groups on a new page
New feature starting with 1.11.1 is the option to break grouped reports starting a new page with each group. After running your grouped report click the report options button and you'll find the "Start Groups on a New Page" menu option which will re-run the report breaking groups on new pages.
We have teamed up with Cirrus Elite Corporation to provide custom reports to fit the Cirrus Elite leather binder solutions. Read about the Cirrus Elite Binder Reports and report system within this help documentation.