


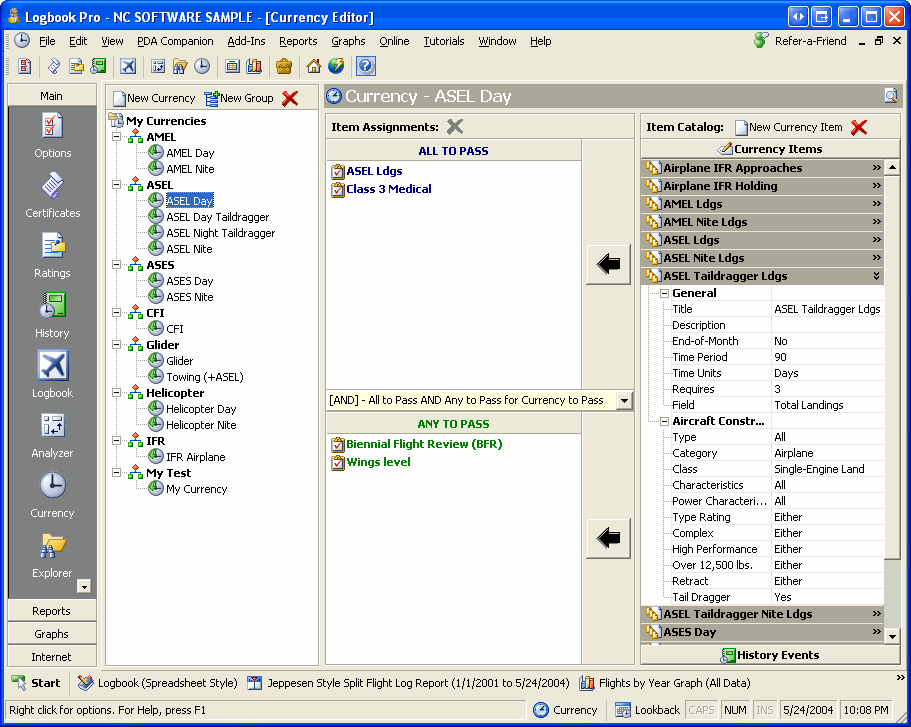
Figure 1. Currency Editor
The Currency Editor is the most powerful currency system available in any software package, hands down. Logbook Pro using this advanced yet simple to use currency editor enables any pilot to create any currency, for any use anywhere in the world. Currencies are calculated instantaneously in several areas of Logbook Pro: 1) Currency Report, 2) Clicking the Currency Button on the Status Bar, or 3) The Currency area of the Logbook Pro Explorer.
Logbook Pro ships with two factory pre-built currencies, VFR Day and VFR Night. As these are the most common, the secondary purpose is to show the user how a currency is created. This discussion will break down the currency editor into three areas: 1) Currency Items (far right section), 2) Assignment Groups (middle section), 3) Currency Groups and Currencies (left section).
Currency Items:
The far right section is a very important part to understand completely to assure successful creation of custom currencies. The right section is actually two separate areas, notice the button on the bottom "History Events." Clicking this button will cause all pre-configured History events to be displayed, which can be used in creating a currency. An example will be reviewed shortly. A currency item is a specific definition of a currency component, of which multiple components can be combined to create an overall currency. Take for example Figure 1 above. The example shows a currency item titled "ASEL Taildragger Ldgs" a descriptive comment allowing you to easily determine the specifications by reading the title. A currency item is defined by specifying whether or not the currency expires at the end-of-the month, time unit, time period, requirement, and target field. The currency item can further be constrained by certain aircraft specifics, such as selecting only a certain number of Types, Categories, Classes, etc., as required. Configure each currency item thoroughly and the currency editor will use this to determine an element of the overall currency, checking to see if this item meets the required specifications. An unlimited number of currency items can be created by clicking the New Currency Item from the toolbar above the currency items section. Right-click popup menus are also available for easy control. Once currencies are created, this system makes it very easy to make changes with minimum effort. Since currencies are made up of currency items, anytime a currency item is changed, all currencies that use this item are automatically updated with this change. There is no reason to reconfigure all created currencies, they will reference the configuration at the time they are run and need no attention.
Assignment Groups:
Once currency items have been configured, they can be used as many times as desired for any number of currencies. To activate a currency group so it can accept currency or history items, a currency must be selected on the far left side, otherwise the groups will be deactivated. The middle section is made up two groups; 1) All to Pass, and 2) Any to Pass. These groups can have items added to it which require the logic just as the caption reads. If you have a currency, for example one that requires 6 Approaches in the last 6 Months AND a current Class 1 Medical AND a Biennial Flight Review all to be good for the currency to pass, then these items would be assigned to the ALL to Pass group, meaning just that, each and every currency item must pass within this group for the currency to pass. The ANY to pass group is just that, if any item within this group passes, the currency itself will be a pass. There can be a set of items (or just one item) in both groups, if either the All to Pass group is a pass or the Any to Pass group is a pass, the currency itself will be a pass. You can add Currency Items or History items to the corresponding group by expanding the currency item (click the caption bar) and then click the button with the arrow pointing to the target group, or right-click the item caption and select the appropriate menu option. For History Items, select the item then click the arrow button to assign the item to a assignment group.
Assignment Group Joining with AND/OR logic:
A drop down selector separates the two assignment groups allowing for powerful currency creation. The two choices are:
AND: This setting requires that All to Pass item group passes *AND* the Any to Pass item group passes for the overall currency to pass
OR: This setting requires that either the All to Pass *OR* the Any to Pass group passes for the overall currency to pass.
For example: If you had a currency where A and B and C must all pass as well as X or Y or Z then you would build the currency so that A, B, and C are in the All to Pass group, then select the AND joining selector and put currency items X, Y, and Z in the Any to pass.
Currency Groups and Currencies:
The far left section is an explorer style view organized by user-defined groups and subsequently currency assignments related to each group. To add a group, click the corresponding button on the toolbar or right-click and choose the Add Group option from the popup menu. Enter a unique name (not already used) for the group, then currencies can be assigned to the group. Click the New Currency button to bring up the dialog as shown in Figure 2 below.
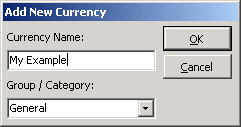
Figure 2. Add/Edit Currency
When double-clicking a currency the same dialog appears as the add currency dialog allowing modification to the currency, i.e. renaming it or assigning to a different or new group. Select the group from the drop down at the bottom, or if not listed, type in the new name and it will be created. Once the dialog is closed (click OK), the currency will appear and be selected ready for assignment of custom currency items or history items.
There is no reason to click a save button, all changes are saved automatically at the time of change. To edit a currency, double-click the currency and the dialog as shown in Figure 2 will appear. To edit a currency name, you can select the currency and hit the F2 key on the keyboard, type in the new name and hit enter. Currencies can be drag and dropped to other currency groups for simple reassignments to other groups. Groups cannot be deleted if it contains currencies, be sure to reassign or delete currencies before attempting to remove a group. Deleting currencies and groups will not affect other currencies or cause any items to be deleted.
As soon as a currency is created it can be immediately evaluated by clicking the Currency button on the status bar, viewing the status by clicking Currency in the Explorer, or running the currency report.
Currencies can be color coded according to colors configured in the Currency Options area. Additionally, a warning time frame can be configured for which a custom color is assigned, as well as a warning window that will appear if a currency or history event is within this warning period at program startup.