


https://www.youtube.com/watch?v=IcGv-JMFusM&list=PLt5jhPpkokeL_tIjuwYkE8M-Q8Lq3sBDq&index=27
The ability to import data to Logbook Pro allows for unlimited flexibility in your flight logging needs. Any TAB or Comma Delimited text data file can be easily imported into Logbook Pro's logbook area by following the simple steps of the Import Wizard.. Most Palm and Pocket PC applications allow export to text delimited data files, making the use of any handheld PDA compatible with Logbook Pro. All spreadsheet applications such as Microsoft Excel, Lotus 123, Microsoft Works, Microsoft Access, etc., have the option to export/save data to text delimited data files, which can be subsequently imported into Logbook Pro.
For best results, prepare your data to match as close as possible that of the Spreadsheet Style log area, i.e. columns and data format. Don't worry about having a separate To/From field as Logbook Pro uses one Route field, the Import Wizard will offer the option of merging the two fields to import properly to Logbook Pro's style, allowing for multiple leg entries per record. To initiate the Import Wizard, click the option within the File menu. Importing data can either append (add to) existing data, or completely replace existing logbook data. For valid logbook entries, an aircraft type must exist in the Options...Aircraft area, therefore Logbook Pro will automatically create Aircraft Type entries for you and notify you that the entry needs attention for complete configuration.
To import user-defined fields that are not the default set of fields offered by Logbook Pro, you must first go to Options...Custom and create the fields. Once the custom fields have been defined, they will be available for import targets.

Figure 1. Import Wizard Step 1
Figure 1 above shows the first screen of the Import Wizard. Choose the file containing the logbook data for import and the options to Backup prior to conducting the transfer (recommended) and the Append or Replace option. Tell Logbook Pro which delimiter is used in the text data file, if not recognized automatically. Click Next to continue with the import process.
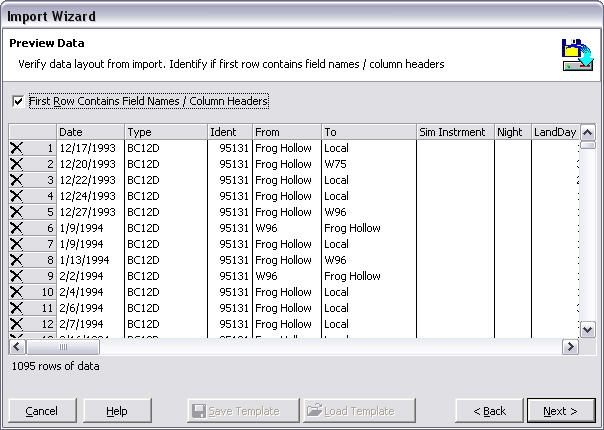
Figure 2. Import Wizard Step 2
The second step of the import process is to verify the data is ready for analysis for the import engine. If the first row contains the column headers, as is shown above, click the checkbox "First Row Contains..." to avoid import errors. If a row is invalid or should not be imported, click the ![]() at the far left to remove the row from the import available data. Click next to begin assigning the columns to target fields.
at the far left to remove the row from the import available data. Click next to begin assigning the columns to target fields.
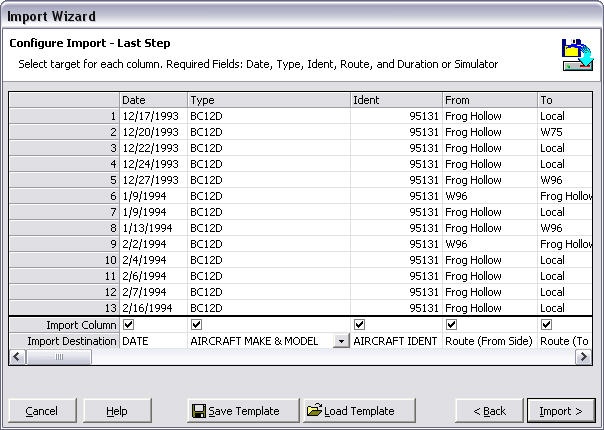
Figure 3. Import Wizard Step 3
In the Import Destination row, select from the drop down list available by clicking in the respective column. When selecting a target field/column, the Import Column checkbox will be checked. Uncheck any columns that are checked if you desire not to import this column. Once the target columns have been configured, click the Import button to execute the Import process. At this time if set in Step 1, the Backup process will take place. Secondly, if the option to Replace existing data was selected, the data will be purged prior to commencing the configured import.
Once the target columns are set, the import configuration can be saved for reuse. Click the Save Template button to save the exact configuration of the target settings (lower grid). When importing data of the EXACT same source layout, click the Load Template and select a previously saved import file. Warning: Any changes in the source layout, i.e. column order or types, matched up to a import map file (template) that does not align with the source columns can result in erroneous data imports. Carefully review the import column mapping PRIOR to clicking the Import button.
When the import process is complete, a printable summary window will appear identifying any errors or items requiring attention, i.e. if Aircraft Types were added and need further attention/configuration in the Options...Aircraft area.
New in 1.7 and later: Flight Times can be imported from formats of HH:mm (1:30), Raw Minutes (90), or Hours.Tenths (1.5) and times will be converted to the Hours.Tenths format used by Logbook Pro. Select the source format from the three options available, as shown on Figure 1 above.