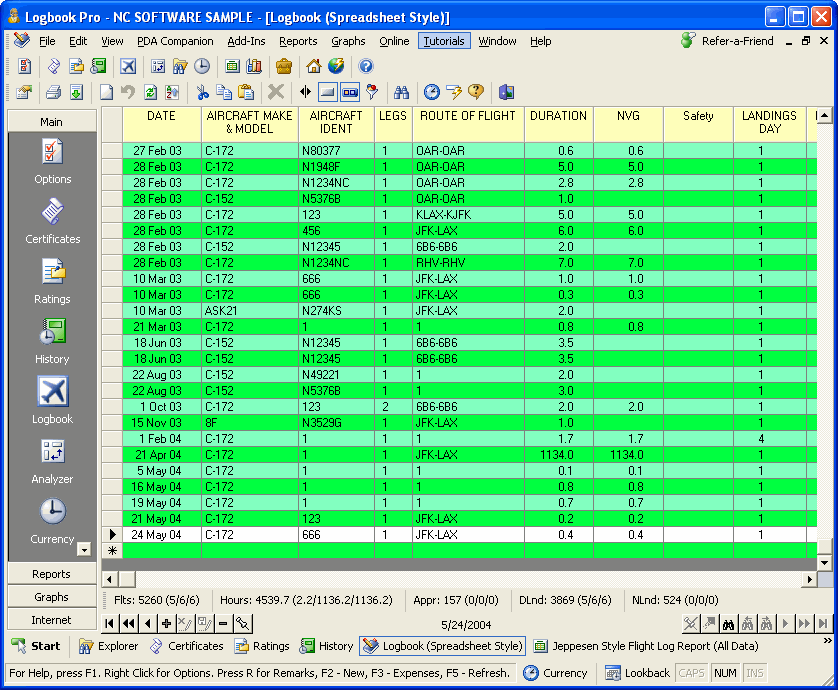
Logbook Pro offers two main styles of data entry, the Spreadsheet Style, as discussed in this section, and the Windows Style, discussed in the next section of this help documentation. The Spreadsheet Style is the easiest and default entry method for Logbook Pro's flight data, providing a flexible, configurable, efficient method of data entry.
Figure 1. Logbook (Spreadsheet Style)
The Spreadsheet Style is easy to use with the minimum field entries of Date, Type, Ident, Route, and Duration (or Sim). You can use the Enter or TAB key to move from column to column, or use the shortcut key "R" to move from any time field to the Remarks field in one keystroke. Hitting the HOME key will move you back to the left side of the screen. The Date Field uses the Date Format as configured in the Flight Log Options section for user-defined formats. To enter Today's date, type in the letter "T" in the date field and today's date will be automatically entered. To enter the previously entered flight date, hit the "P" key on the keyboard. The Aircraft Type field lists the Types as configured in the Aircraft Options area. To add more Types, click the button on the toolbar to add types when this field is selected, or right-click and use the popup menu to choose the option to add additional aircraft types. The Ident field will automatically fill based on the Type selected, if not listed, type in the new Ident manually and it will be available for the corresponding type for future entries.
Logbook Pro uses a new route format for flight logging breaking the traditional From-To style columns in the paper logbook systems. With Logbook Pro's combined format, enter all legs of a day's flights in one entry, separated by hyphens. Use the Legs column to specify the number of flights (or legs) this record contains. The route of flight can be entered manually or selected from the drop down list containing the 15 most recently flown routes. The remainder of the columns are self-explanatory. If a Flight Cost (hourly rate) is configured in the Aircraft Options area for the type entered, when the duration value is entered the flight cost will be calculated multiplying the hourly rate configured times the duration value.
The bottom of the entry area is the Enhanced Data Navigator, which is described in the Toolbar section of this help documentation. At the very bottom of the image above is the summary bar which can be configured to display time summaries of various fields, user-configurable within Logbook Pro. Read more about the Summary Bar in the Toolbar section of this help documentation.
Figure 2. Logbook Data Filter
The spreadsheet style logbook can be filtered using the Filter Toolbar as shown in Figure 2 above. When the filter bar is displayed by clicking the funnel style button the data in the logbook can be filtered for easy analysis. A date range can be specified from the drop down on the far left, preset or custom dates, particular aircraft types can be displayed, or time filtered to flights only or simulator entries only. Once the filter selections are made, click the Update button to apply the filter. When clicking the funnel icon on the sub-toolbar, the filter toolbar will disappear and the logbook data restored to show all data.
The format of the Spreadsheet style system is completely customizable. The quickest way to customize the layout is clicking the small white icon on the far left of the sub-toolbar (settings). Font styles, colors, even/odd row colors, etc. can all be configured per user preference. Columns can be hidden using the Display Configuration option in the Flight Log Options area or the right-click popup menus. The layout will be remembered for subsequent use. When custom columns are defined in the Custom Options area, the columns will appear as required. Approaches are entered by clicking the button that appears when the approach field is activated. A dialog will appear allowing you to select the approach types and number flown.
Logbook Pro reports match the layout of the Spreadsheet Style log, therefore it is important to format the Spreadsheet Style log exactly the way you want the reports to appear, unless using the Jeppesen or MGOent style reports. It is best to make the logbook the minimum number of columns as a report that becomes too wide is hard to manage when printed. Size the columns in the Spreadsheet Style to a minimum by click and dragging the right edge of the column header. Hide columns not used in the Display Configuration section of the program. Fonts and date formats will also be carried forward to the reports.
Logbook Pro also offers advanced sorting routines built right into the data entry area. Click the column header to force a sort on the target column, click the column header again to sort in the opposite direction. The default sort for Logbook Pro is chronological by date, therefore flights can be entered in any order. When the Spreadsheet Style logbook opens it will sort date ascending, the default sort method.
The spreadsheet style layout can be exported to numerous formats as described in the Export section of this help documentation. Logbook Pro also offers a powerful printing capability to capture the exact layout and user-defined display settings by clicking the print icon on the sub-toolbar, allowing the option to print directly from the spreadsheet. Selected rows can be printed by clicking the row selectors at the far left, using standard SHIFT + CLICK's to select a range of rows or CTRL + CLICK's to select non-contiguous rows.


